

Introducción
En este proyecto vas a construir un servidor web con el ESP32 que te permite controlar un LED programando un temporizador con acciones de encendido (ON) o apagado (OFF) por un período en segundos, minutos u horas. La página web también tiene dos botones para encender o apagar el LED de inmediato. Programaremos el ESP32 usando el Arduino IDE.
Si recién estás partiendo con servidores web en ESP32, revisa nuestra guía completa para principiantes con Arduino IDE.
Resumen del proyecto
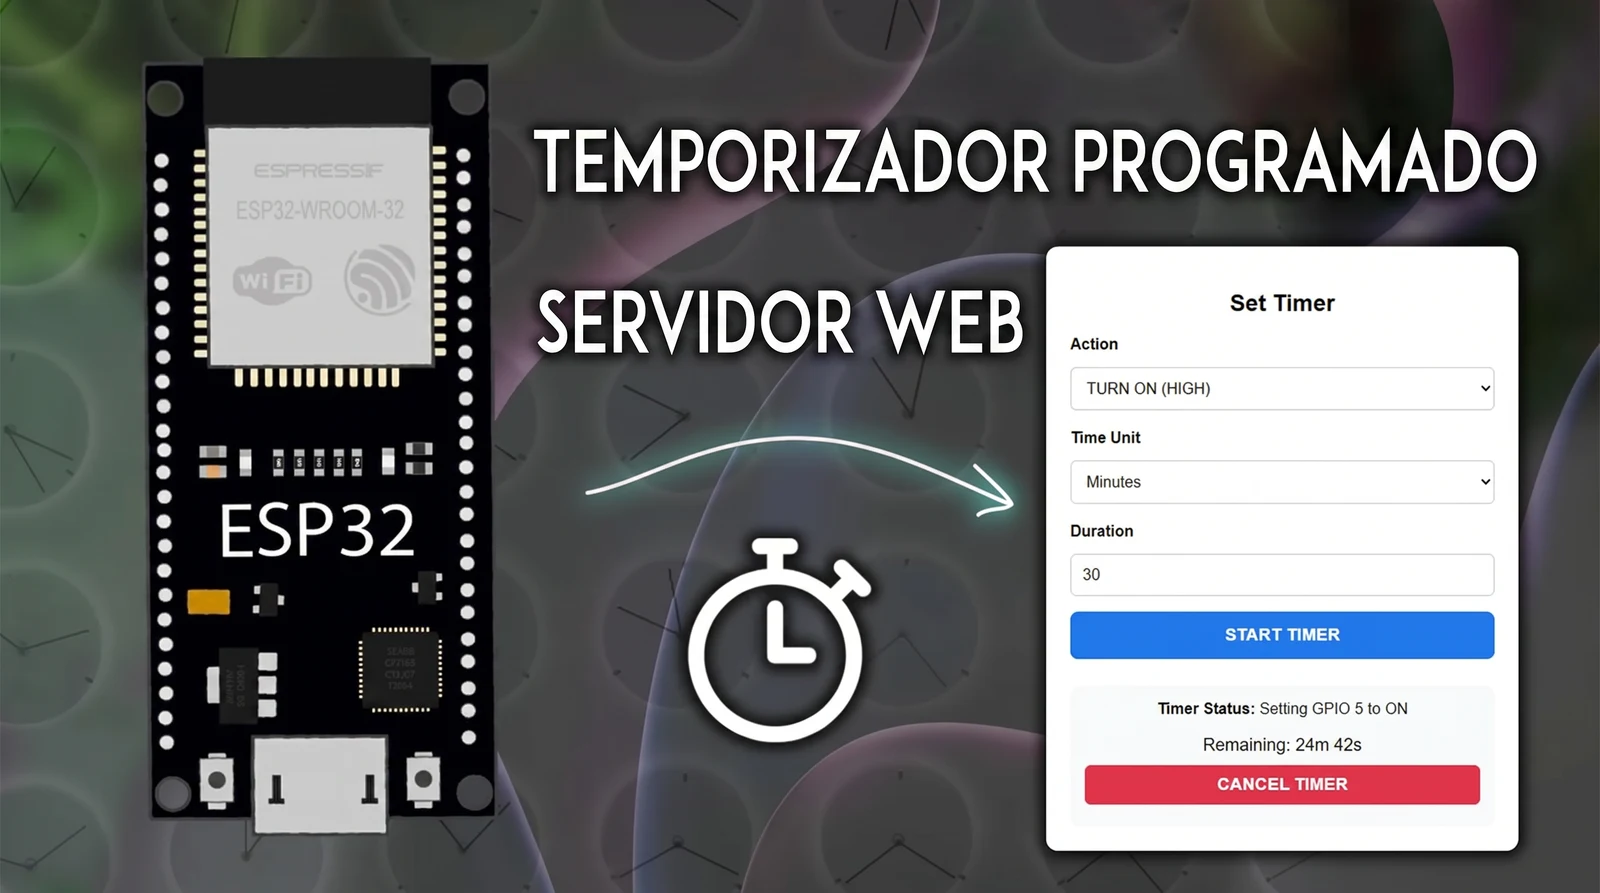
La siguiente imagen muestra la página web que construirás en este proyecto:
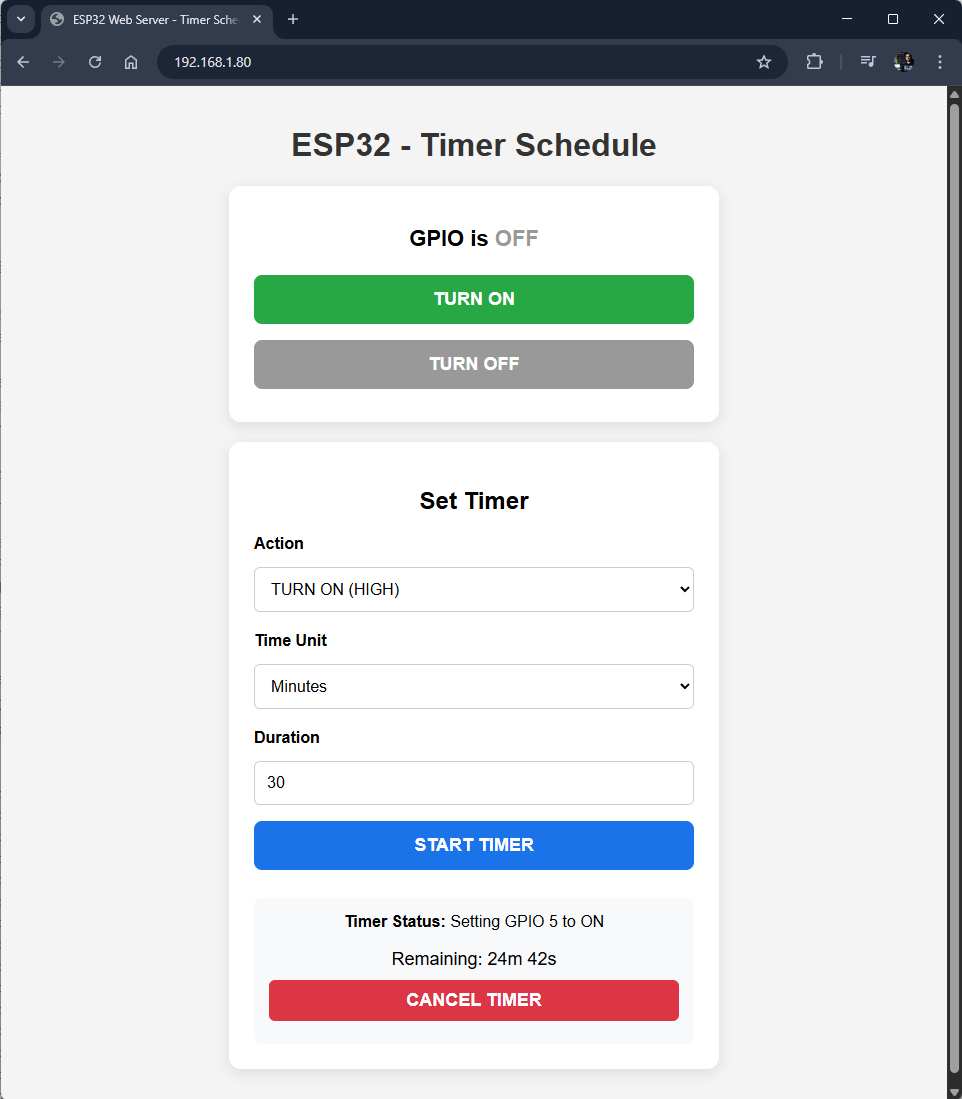
Funcionalidades principales del servidor web:
- Estado actual del LED: etiqueta de texto "GPIO is ON" / "GPIO is OFF"
- Control instantáneo del LED: botones TURN ON / TURN OFF
- Formulario HTML para el temporizador: define la acción (ENCENDER/APAGAR), la unidad de tiempo y la duración
- Estado del temporizador y tiempo restante para la próxima acción
- Botón para cancelar el temporizador
Para simplificar, vamos a guardar el HTML y el CSS dentro de una variable en el sketch de Arduino, pero también puedes servir los archivos desde el sistema LittleFS si prefieres.
Requisitos previos
Antes de seguir esta guía, necesitas tener instalado el ESP32 Core en tu Arduino IDE. Si todavía no lo haces, revisa la guía de instalación.
También necesitas una placa ESP32 (cualquier modelo de tu preferencia).
Materiales
- Placa ESP32 (el modelo que prefieras: ESP32 WROOM, ESP32 DevKit V1, etc.)
- LED de 5 mm
- Resistencia de 220 Ω o 330 Ω (opcional pero recomendada)
- Protoboard y cables jumper
- Cable USB para programar la placa
Las conexiones son simples: el ánodo del LED va al GPIO 5 a través de la resistencia, y el cátodo a GND. Puedes cambiar el pin editando la línea const int ledPin = 5; en el código.
Instalar las librerías necesarias en Arduino IDE
Vamos a usar las siguientes librerías para construir el servidor web:
- ESPAsyncWebServer by ESP32Async
- AsyncTCP by ESP32Async
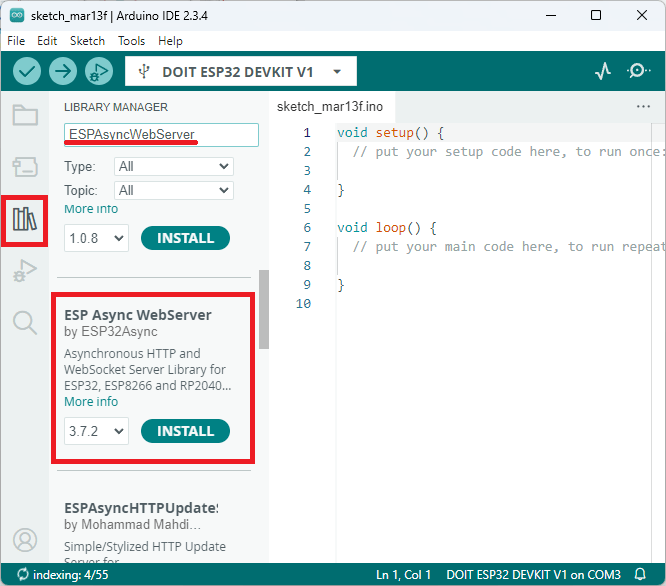
Puedes instalarlas desde el Library Manager del Arduino IDE. Abre el Library Manager haciendo clic en el ícono de librería en la barra lateral izquierda.
Busca ESPAsyncWebServer e instala la versión de ESP32Async:
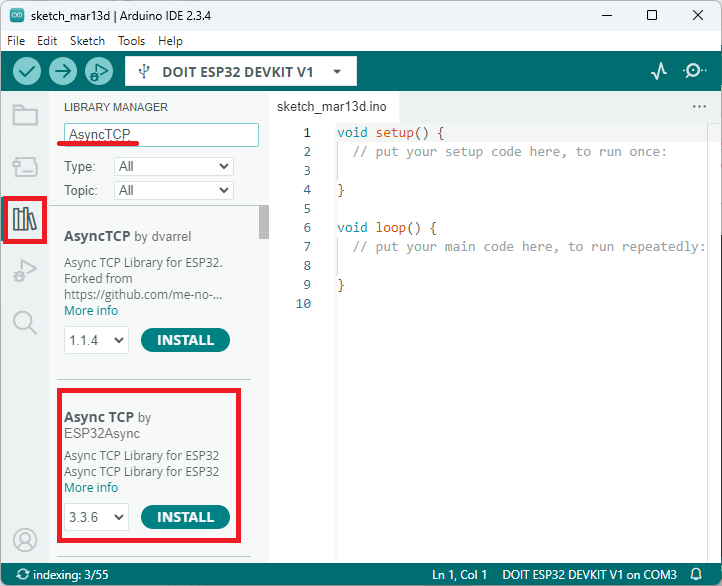
Luego instala la librería AsyncTCP. Busca AsyncTCP e instala la versión de ESP32Async:
Sketch de Arduino: servidor web con temporizador
El siguiente código crea un servidor web que sirve una página HTML para programar el encendido o apagado de un LED por un tiempo determinado.
Importante: antes de subir el código, reemplaza
REPLACE_WITH_YOUR_SSIDyREPLACE_WITH_YOUR_PASSWORDcon las credenciales de tu red WiFi.
/*********
  Rui Santos & Sara Santos - Random Nerd Tutorials
  Complete project details at https://RandomNerdTutorials.com/esp32-web-server-timer-schedule-arduino/
  Permission is hereby granted, free of charge, to any person obtaining a copy of this software and associated documentation files.
  The above copyright notice and this permission notice shall be included in all copies or substantial portions of the Software.
*********/
#include <Arduino.h>
#include <WiFi.h>
#include <AsyncTCP.h>
#include <ESPAsyncWebServer.h>
#include <freertos/timers.h>

// REPLACE WITH YOUR NETWORK CREDENTIALS
const char* ssid = "REPLACE_WITH_YOUR_SSID";
const char* password = "REPLACE_WITH_YOUR_PASSWORD";

// LED connected to GPIO 5
const int ledPin = 5;

// Global variables
AsyncWebServer server(80);

TimerHandle_t gpioTimer = NULL;
// Timer action: 1 = ON, 0 = OFF
int targetAction = -1;

TickType_t timerStartTick = 0;
uint64_t totalDurationTicks = 0;

// HTML Web Page
const char index_html[] PROGMEM = R"rawliteral(
<!DOCTYPE HTML>
<html>
<head>
  <title>ESP32 Web Server - Timer Schedule</title>
  <meta name="viewport" content="width=device-width, initial-scale=1">
  <style>
    body { font-family: Arial, sans-serif; text-align: center; margin: 0; padding: 20px; background: #f4f4f4; }
    h1 { color: #333; }
    .card { max-width: 440px; margin: 20px auto; padding: 25px; background: white; border-radius: 12px; box-shadow: 0 4px 15px rgba(0,0,0,0.1); }
    button { width: 100%; padding: 14px; margin: 8px 0; font-size: 18px; border: none; border-radius: 8px; cursor: pointer; font-weight: bold; }
    .onButton { background: #28a745; color: white; }
    .offButton { background: #999999; color: white; }
    button:hover { opacity: 0.95; }
    .state { font-size: 22px; font-weight: bold; margin: 15px 0; }
    .ledOn { color: #28a745; }
    .ledOff { color: #999999; }
    label { display: block; margin: 12px 0 6px; font-weight: bold; text-align: left; }
    select, input[type="number"] { width: 100%; padding: 12px; margin: 8px 0; font-size: 16px; border-radius: 6px; border: 1px solid #ccc; box-sizing: border-box;}
    .startButton { background:#1a73e8; color:white; }
    #cancelButton { display:none; background:#dc3545; color:white; padding:10px 20px; border:none; border-radius:6px; cursor:pointer; margin-top:10px; }
  </style>
</head>
<body>
  <h1>ESP32 - Timer Schedule</h1>
  <div class="card">
    <div class="state">GPIO is <span id="ledState">Loading...</span></div>
    <button class="onButton" onclick="controlLED(1)">TURN ON</button>
    <button class="offButton" onclick="controlLED(0)">TURN OFF</button>
  </div>
  <div class="card">
    <h2>Set Timer</h2>
    <form id="timerForm" action="/set-timer" method="POST">
      <label for="action">Action</label>
      <select name="action" id="action">
        <option value="" disabled selected hidden>--- Select Action ---</option>
        <option value="1">TURN ON (HIGH)</option>
        <option value="0">TURN OFF(LOW)</option>
      </select>
      <label for="unit">Time Unit</label>
      <select name="unit" id="unit">
        <option value="s">Seconds</option>
        <option value="m">Minutes</option>
        <option value="h">Hours</option>
      </select>
      <label for="duration">Duration</label>
      <input type="number" name="duration" id="duration" min="1" value="30" required>
      <button type="submit" class="startButton">START TIMER</button>
    </form>
    <div style="margin-top:20px; padding:15px; background:#f8f9fa; border-radius:8px;">
      <strong>Timer Status:</strong> <span id="status">No active timers</span><br><br>
      <span id="remaining" style="font-size:18px;"></span><br>
      <button id="cancelButton" onclick="cancelTimer()">
        CANCEL TIMER
      </button>
    </div>
  </div>

  <script>
    // Update LED State
    function updateLEDState() {
      fetch('/led-state')
        .then(r => r.json())
        .then(data => {
          const stateEl = document.getElementById('ledState');
          if (data.state === 1) {
            stateEl.innerHTML = '<span class="ledOn">ON</span>';
          } else {
            stateEl.innerHTML = '<span class="ledOff">OFF</span>';
          }
        })
        .catch(() => {
          document.getElementById('ledState').innerHTML = 'Error';
        });
    }
    // Control LED
    function controlLED(state) {
      fetch('/control?state=' + state)
        .then(() => updateLEDState());
    }

    // Timer functions
    let countdownInterval = null;
    let remainingSeconds = 0;
    // Format time to hours, minutes and seconds
    function formatTime(seconds) {
      if (seconds <= 0) return "0s";
      let h = Math.floor(seconds / 3600);
      let m = Math.floor((seconds % 3600) / 60);
      let s = seconds % 60;
      if (h > 0) return h + "h " + m + "m " + s + "s";
      if (m > 0) return m + "m " + s + "s";
      return s + "s";
    }
    // Check the remaining time for the timer to end
    function updateTimerStatus() {
      fetch('/timer-status')
        .then(r => r.json())
        .then(data => {
          document.getElementById('status').innerText = data.status;

          const cancelButton = document.getElementById('cancelButton');
          const remainingEl = document.getElementById('remaining');

          if (data.active) {
            remainingSeconds = data.remaining_seconds;
            cancelButton.style.display = 'inline-block';

            if (!countdownInterval) {
              countdownInterval = setInterval(() => {
                if (remainingSeconds > 0) {
                  remainingSeconds--;
                  remainingEl.innerText = "Remaining: " + formatTime(remainingSeconds);
                } else {
                  clearInterval(countdownInterval);
                  countdownInterval = null;
                }
              }, 1000);
            }
            remainingEl.innerText = "Remaining: " + formatTime(remainingSeconds);
          } else {
            cancelButton.style.display = 'none';
            remainingEl.innerText = "";
            if (countdownInterval) {
              clearInterval(countdownInterval);
              countdownInterval = null;
            }
          }
        });
    }
    // Cancel timer button
    function cancelTimer() {
      if (confirm("Cancel the current timer?")) {
        fetch('/cancel-timer', { method: 'POST' })
          .then(() => updateTimerStatus());
      }
    }

    // Update every 10 seconds
    setInterval(() => {
      updateLEDState();
      updateTimerStatus();
    }, 10000);
    window.onload = () => {
      updateLEDState();
      updateTimerStatus();
    };
  </script>
</body>
</html>
)rawliteral";

// Timer Callback - Turns the LED on or off depending on the action selected
void IRAM_ATTR timerCallback(TimerHandle_t xTimer) {
  if (targetAction != -1) {
    digitalWrite(ledPin, targetAction ? HIGH : LOW);
    Serial.printf("Timer finished: GPIO %d set to %s\n", ledPin, targetAction ? "HIGH (ON)" : "LOW (OFF)");
  }
  targetAction = -1;
  timerStartTick = 0;
  totalDurationTicks = 0;
}

void setup() {
  Serial.begin(115200);
  delay(1000);

  // Define ledPin as an OUTPUT and initialize it off (LOW)
  pinMode(ledPin, OUTPUT);
  digitalWrite(ledPin, LOW);

  // Create a timer and assign the timerCallback function
  gpioTimer = xTimerCreate("GPIO_Timer", pdMS_TO_TICKS(1000), pdFALSE, 0, timerCallback);

  // Start the Wi-Fi connection
  WiFi.begin(ssid, password);
  Serial.print("Connecting to Wi-Fi");
  while (WiFi.status() != WL_CONNECTED) {
    delay(500);
    Serial.print(".");
  }
  Serial.println("\nWi-Fi Connected!");
  // Print the ESP32 IP Address
  Serial.print("Access ESP32 IP Address: http://");
  Serial.println(WiFi.localIP());

  // Root URL handler
  server.on("/", HTTP_GET, [](AsyncWebServerRequest *request) {
    request->send_P(200, "text/html", index_html);
  });

  // Instant LED control
  server.on("/control", HTTP_GET, [](AsyncWebServerRequest *request) {
    if (request->hasParam("state")) {
      int state = request->getParam("state")->value().toInt();
      digitalWrite(ledPin, state ? HIGH : LOW);
      Serial.printf("LED set to %s\n", state ? "ON" : "OFF");
    }
    request->send(200, "text/plain", "OK");
  });

  // Get current LED state
  server.on("/led-state", HTTP_GET, [](AsyncWebServerRequest *request) {
    int state = digitalRead(ledPin);
    request->send(200, "application/json", "{\"state\":" + String(state) + "}");
  });

  // Set the timer duration to perform the action selected
  server.on("/set-timer", HTTP_POST, [](AsyncWebServerRequest *request) {
    if (request->hasParam("action", true) && request->hasParam("duration", true) && request->hasParam("unit", true)) {

      targetAction = request->getParam("action", true)->value().toInt();
      int dur = request->getParam("duration", true)->value().toInt();
      String unit = request->getParam("unit", true)->value();

      uint64_t durationSeconds = 0;
      if (unit == "s")      durationSeconds = (uint64_t)dur;
      else if (unit == "m") durationSeconds = (uint64_t)dur * 60ULL;
      else if (unit == "h") durationSeconds = (uint64_t)dur * 3600ULL;

      if (durationSeconds > 0) {
        if (xTimerIsTimerActive(gpioTimer)) xTimerStop(gpioTimer, 0);

        uint64_t tempTicks = durationSeconds * (uint64_t)configTICK_RATE_HZ;
        TickType_t timerTicks = (tempTicks > 0xFFFFFFFFULL) ? 0xFFFFFFFFULL : (TickType_t)tempTicks;

        timerStartTick = xTaskGetTickCount();
        totalDurationTicks = tempTicks;

        xTimerChangePeriod(gpioTimer, timerTicks, 0);
        xTimerStart(gpioTimer, 0);

        Serial.printf("Timer scheduled: GPIO %d will be set to %s in %llu seconds\n", ledPin,
                      targetAction ? "ON" : "OFF", durationSeconds);
      }
    }
    request->redirect("/");
  });

  // Cancel Timer
  server.on("/cancel-timer", HTTP_POST, [](AsyncWebServerRequest *request) {
    // Stop the active timer
    if (xTimerIsTimerActive(gpioTimer)) {
      xTimerStop(gpioTimer, 0);
      Serial.println("Timer cancelled");
    }
    targetAction = -1;
    timerStartTick = 0;
    totalDurationTicks = 0;
    request->send(200, "text/plain", "OK");
  });

  // Timer Status - Returns the remaining time in seconds
  server.on("/timer-status", HTTP_GET, [](AsyncWebServerRequest *request) {
    if (targetAction != -1 && xTimerIsTimerActive(gpioTimer) && totalDurationTicks > 0) {
      // Calculate how many seconds are left for the timer to end
      TickType_t now = xTaskGetTickCount();
      uint64_t elapsedTicks = 0;

      if (now >= timerStartTick) {
        elapsedTicks = now - timerStartTick;
      } else {
        elapsedTicks = (0xFFFFFFFFULL - timerStartTick) + now + 1;
      }

      uint64_t remainingTicks = (totalDurationTicks > elapsedTicks) ? totalDurationTicks - elapsedTicks : 0;
      uint64_t remainingSeconds = remainingTicks / (uint64_t)configTICK_RATE_HZ;

      // Return the amount of seconds left and action that will execute when the timer ends
      String json = "{\"status\":\"Setting GPIO "+ String(ledPin) +" to " +
                    String(targetAction ? "ON" : "OFF") + "\",";
      json += "\"active\":true,";
      json += "\"remaining_seconds\":" + String((unsigned long)remainingSeconds) + "}";
      request->send(200, "application/json", json);
    } else {
      request->send(200, "application/json", "{\"status\":\"No active timers\",\"active\":false,\"remaining_seconds\":0}");
    }
  });

  server.begin();
  Serial.println("ESP32 Web Server Timer Schedule is Ready!");
}

void loop() {
  vTaskDelay(pdMS_TO_TICKS(100));
}
Cómo funciona el código
A grandes rasgos, el sketch hace lo siguiente:
- Conecta el ESP32 a tu red WiFi usando las credenciales que pongas en
ssidypassword. - Levanta un servidor web asincrónico en el puerto 80 con la librería ESPAsyncWebServer.
- Define las rutas HTTP del servidor:
/devuelve la página HTML con el formulario y los botones./control?state=1y/control?state=0encienden o apagan el LED de inmediato./led-statedevuelve el estado actual del LED en JSON./set-timerrecibe el formulario y crea un temporizador FreeRTOS con la duración seleccionada./timer-statusdevuelve el estado del temporizador (activo, segundos restantes)./cancel-timercancela el temporizador en curso.
- Usa timers de FreeRTOS (
xTimerCreate,xTimerStart,xTimerStop) para programar la acción sin bloquear el loop principal. - La página web consulta el estado cada 10 segundos con
fetch()y actualiza la cuenta regresiva en tiempo real consetInterval().
Subir y probar
- Conecta tu ESP32 al PC con el cable USB.
- Configura el board y el puerto en el Arduino IDE (Tools > Board > ESP32 Dev Module, y selecciona el puerto correcto).
- Sube el código con el botón Upload.
- Abre el Serial Monitor a 115200 baudios para ver la dirección IP que el ESP32 obtuvo del router.
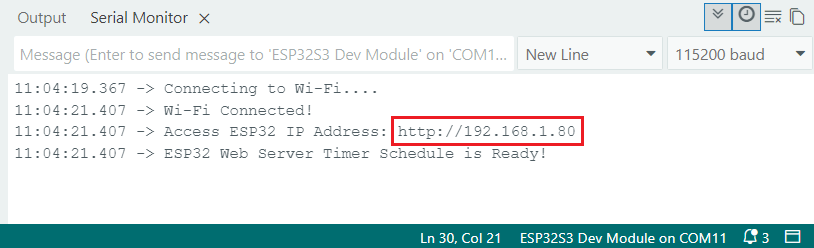
- Escribe esa IP en tu navegador (PC o teléfono en la misma red WiFi) y deberías ver la página de control.
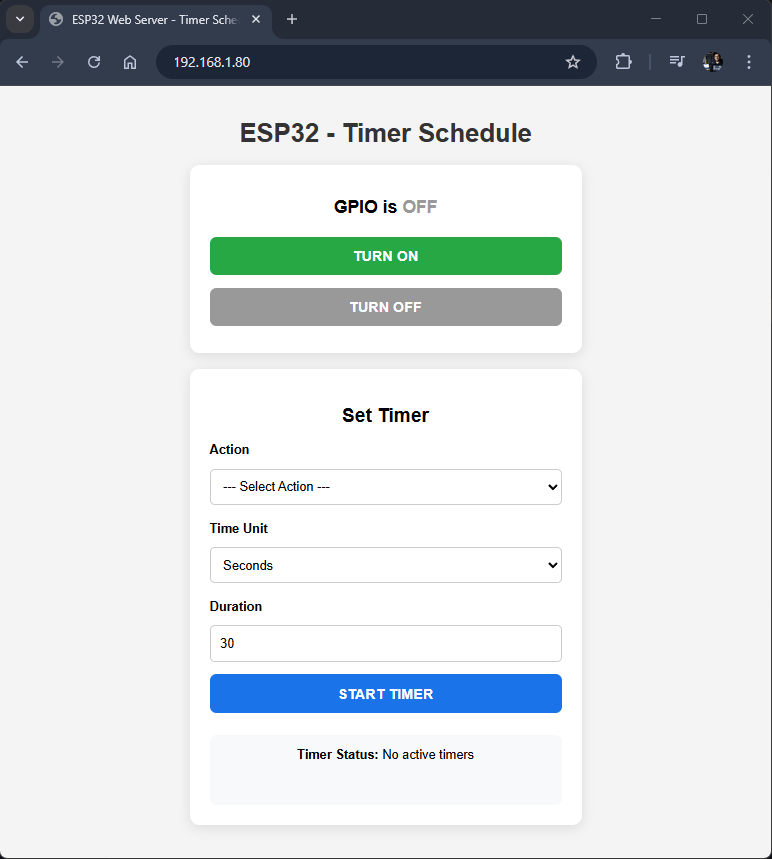
Prueba a definir un temporizador de 30 segundos para ENCENDER el LED. El estado y el tiempo restante deberían actualizarse automáticamente.
Variantes y mejoras
Una vez que tengas el proyecto base funcionando, puedes extenderlo fácilmente:
- Controla cargas reales con un relé: en lugar de un LED, conecta el GPIO 5 a la entrada de un módulo relé y maneja una ampolleta, un ventilador o una bomba de agua con el mismo temporizador.
- Agrega varios canales: declara más pines de salida y duplica el formulario para programar, por ejemplo, encender la luz del living a una hora y apagar el riego en otra.
- Guarda la última configuración: usa la librería Preferences del ESP32 para almacenar la última acción y duración en la memoria NVS, así el temporizador sobrevive a un corte de luz.
Personalización para Chile
En Chile puedes conseguir todo lo necesario en MechatronicStore:
- Placa ESP32 DevKit (Tipo C) (SKU X2-10V2): $9.990 (agotado)
- LED 5 mm rojo (SKU GA1-5): $100
- Resistencia 220 Ω 1/4W (SKU GK1-18): $100
- Protoboard 830 puntos MB102 (SKU C-302): $3.790
- Cables jumper macho macho (SKU C-417): $2.990
- Cable USB Tipo C a USB Tipo A 1mt (SKU B-101): $2.190
El ESP32 DevKit del catálogo cumple exactamente la misma función que cualquier placa ESP32 WROOM del tutorial original, con WiFi integrado y listo para el Arduino IDE.
Recursos
- Tutorial original: ESP32 Web Server: Set Timer Schedule (Arduino IDE) por Rui Santos y Sara Santos (Random Nerd Tutorials)
- Código completo (.ino): ESP32_Timer_Web_Server.ino
Versión chilena con componentes en stock local en MechatronicStore.