

¿Quieres mostrar la hora, un contador o la temperatura en un display rojo bien legible sin complicarte con decenas de pines? El TM1637 es justo eso: un módulo de 4 dígitos y 7 segmentos que se controla con solo dos cables de datos. En esta guía vas a aprender a conectarlo a un ESP32 o a un ESP8266, instalar la librería de MicroPython y usar sus funciones para mostrar texto, números, caracteres y temperatura. Como proyecto final, vas a armar un pronosticador del clima que lee datos reales desde internet y los muestra en el display.
Al terminar vas a saber cablear el módulo, cargar la librería en la placa con Thonny IDE, controlar cada segmento a mano y conectar el display a una API de clima vía WiFi.
Lo que vas a aprender
Este tutorial cubre los siguientes temas:
- Qué es el display LED TM1637 de 4 dígitos y 7 segmentos
- Cómo conectar el display TM1637 al ESP32 o ESP8266
- Cómo instalar la librería de MicroPython para el TM1637
- Cómo probar el display con las funciones básicas
- Cómo armar un pronosticador de temperatura y clima
Antes de empezar
Para seguir esta guía necesitas tener el firmware de MicroPython instalado en tu ESP32 o ESP8266, y un IDE para escribir y subir el código. Te recomendamos Thonny IDE o uPyCraft IDE:
- Thonny IDE:
- uPyCraft IDE:
- Comenzando con uPyCraft IDE
- Instalar uPyCraft IDE (Windows, Mac OS X, Linux)
- Cargar el firmware de MicroPython al ESP32 y ESP8266
Qué es el display LED TM1637 de 4 dígitos
El TM1637 es un módulo que combina cuatro dígitos de 7 segmentos en una sola pantalla, manejados por el chip controlador TM1637. El módulo que usamos aquí trae cuatro dígitos separados por dos puntos (un colon) entre el segundo y el tercer dígito, ideal para mostrar la hora tipo reloj.
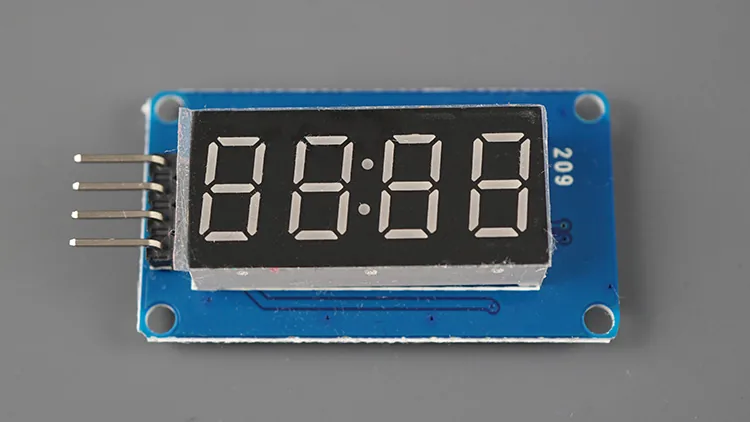
Existen módulos parecidos con puntos decimales entre los dígitos en lugar del colon. También hay versiones de seis dígitos, pero esas necesitan una librería distinta a la que usaremos aquí. El autor original cuenta que probó su módulo de seis dígitos y no logró hacerlo funcionar (muchos vienen fallados de fábrica), así que esta guía se centra solo en el de cuatro dígitos con colon al medio.
Conexión del display TM1637 al ESP32 o ESP8266
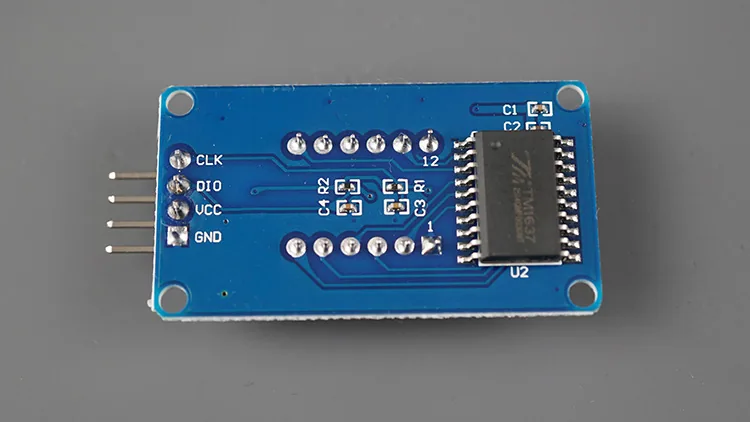
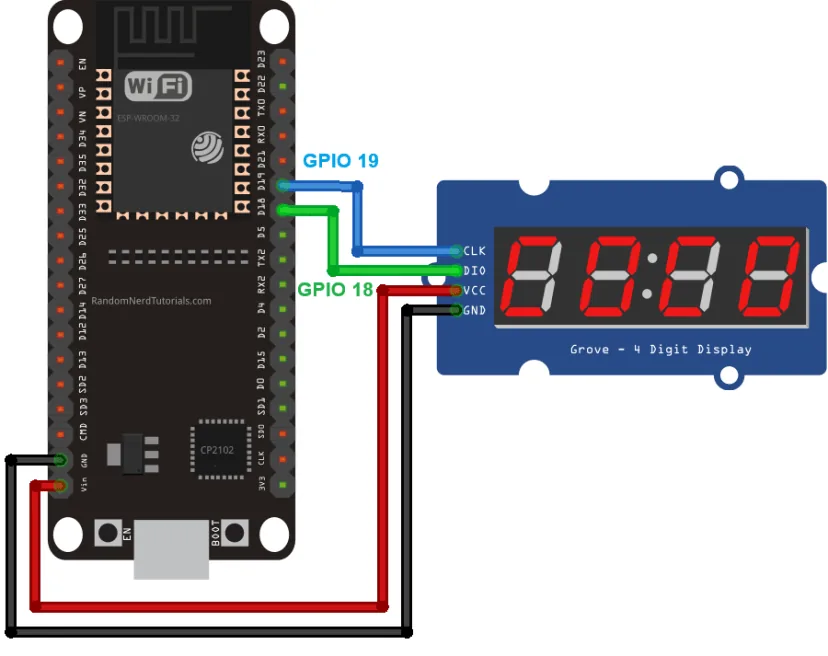
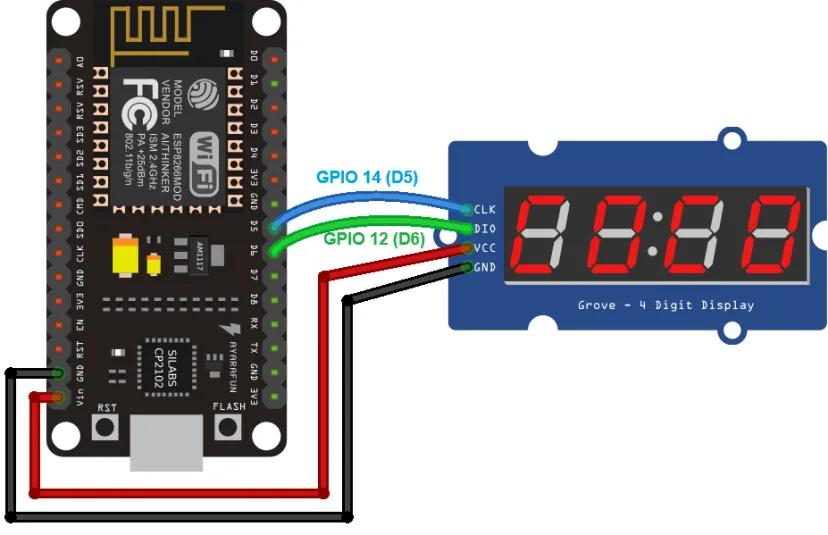
Cablear el display es muy simple porque solo se usan dos pines digitales para los datos: CLK y DIO. Los otros dos son alimentación.
| Display TM1637 | ESP32 | ESP8266 |
|---|---|---|
| CLK | Cualquier pin digital (por ejemplo: GPIO 19)* | Cualquier pin digital (por ejemplo: GPIO 14 / D5)* |
| DIO | Cualquier pin digital (por ejemplo: GPIO 18)* | Cualquier pin digital (por ejemplo: GPIO 12 / D6)* |
| VCC | VIN | VIN |
| GND | GND | GND |
* Puedes usar cualquier otro GPIO adecuado. Si tienes dudas de qué pines conviene usar, revisa las guías de pinout:
- ESP32 Pinout Reference: ¿qué pines GPIO deberías usar?
- ESP32 S3 DevKitC Pinout Reference Guide
- ESP8266 Pinout Reference: ¿qué pines GPIO deberías usar?
ESP32
En el ejemplo conectamos el pin CLK al GPIO 19 y el pin DIO al GPIO 18, pero puedes usar otra combinación.
ESP8266
En el ESP8266 conectamos el pin CLK al GPIO 14 (D5) y el pin DIO al GPIO 12 (D6), aunque también puedes cambiar la combinación.
Instalar la librería de MicroPython para el TM1637
Para comunicarte con el display sin pelear con el protocolo a bajo nivel, vas a usar una versión forkeada de este módulo MicroPython para TM1637.
Sigue estos pasos para instalarla:
- Descarga aquí la versión forkeada del archivo tm1637.py.
- Copia el código a un archivo nuevo en Thonny IDE.
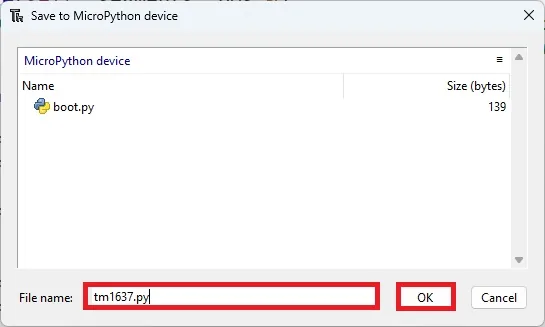
- Ve a File > Save as… y elige MicroPython Device.
- Guarda el archivo con el nombre tm1637.py exactamente (no lo cambies).
"""
MicroPython TM1637 quad 7-segment LED display driver
https://github.com/mcauser/micropython-tm1637

MIT License
Copyright (c) 2016-2023 Mike Causer

Permission is hereby granted, free of charge, to any person obtaining a copy
of this software and associated documentation files (the "Software"), to deal
in the Software without restriction, including without limitation the rights
to use, copy, modify, merge, publish, distribute, sublicense, and/or sell
copies of the Software, and to permit persons to whom the Software is
furnished to do so, subject to the following conditions:

The above copyright notice and this permission notice shall be included in all
copies or substantial portions of the Software.

THE SOFTWARE IS PROVIDED "AS IS", WITHOUT WARRANTY OF ANY KIND, EXPRESS OR
IMPLIED, INCLUDING BUT NOT LIMITED TO THE WARRANTIES OF MERCHANTABILITY,
FITNESS FOR A PARTICULAR PURPOSE AND NONINFRINGEMENT. IN NO EVENT SHALL THE
AUTHORS OR COPYRIGHT HOLDERS BE LIABLE FOR ANY CLAIM, DAMAGES OR OTHER
LIABILITY, WHETHER IN AN ACTION OF CONTRACT, TORT OR OTHERWISE, ARISING FROM,
OUT OF OR IN CONNECTION WITH THE SOFTWARE OR THE USE OR OTHER DEALINGS IN THE
SOFTWARE.
"""

__version__ = '1.3.0'

from micropython import const
from machine import Pin
from time import sleep_us, sleep_ms

TM1637_CMD1 = const(64)  # 0x40 data command
TM1637_CMD2 = const(192) # 0xC0 address command
TM1637_CMD3 = const(128) # 0x80 display control command
TM1637_DSP_ON = const(8) # 0x08 display on
TM1637_DELAY = const(10) # 10us delay between clk/dio pulses
TM1637_MSB = const(128)  # msb is the decimal point or the colon depending on your display

# 0-9, a-z, blank, dash, star
_SEGMENTS = bytearray(b'\x3F\x06\x5B\x4F\x66\x6D\x7D\x07\x7F\x6F\x77\x7C\x39\x5E\x79\x71\x3D\x76\x06\x1E\x76\x38\x55\x54\x3F\x73\x67\x50\x6D\x78\x3E\x1C\x2A\x76\x6E\x5B\x00\x40\x63')

class TM1637(object):
    """Library for quad 7-segment LED modules based on the TM1637 LED driver."""
    def __init__(self, clk, dio, brightness=7):
        self.clk = clk
        self.dio = dio

        if not 0 <= brightness <= 7:
            raise ValueError("Brightness out of range")
        self._brightness = brightness

        self.clk.init(Pin.OUT, value=0)
        self.dio.init(Pin.OUT, value=0)
        sleep_us(TM1637_DELAY)

        self._write_data_cmd()
        self._write_dsp_ctrl()

    def _start(self):
        self.dio(0)
        sleep_us(TM1637_DELAY)
        self.clk(0)
        sleep_us(TM1637_DELAY)

    def _stop(self):
        self.dio(0)
        sleep_us(TM1637_DELAY)
        self.clk(1)
        sleep_us(TM1637_DELAY)
        self.dio(1)

    def _write_data_cmd(self):
        # automatic address increment, normal mode
        self._start()
        self._write_byte(TM1637_CMD1)
        self._stop()

    def _write_dsp_ctrl(self):
        # display on, set brightness
        self._start()
        self._write_byte(TM1637_CMD3 | TM1637_DSP_ON | self._brightness)
        self._stop()

    def _write_byte(self, b):
        for i in range(8):
            self.dio((b >> i) & 1)
            sleep_us(TM1637_DELAY)
            self.clk(1)
            sleep_us(TM1637_DELAY)
            self.clk(0)
            sleep_us(TM1637_DELAY)
        self.clk(0)
        sleep_us(TM1637_DELAY)
        self.clk(1)
        sleep_us(TM1637_DELAY)
        self.clk(0)
        sleep_us(TM1637_DELAY)

    def brightness(self, val=None):
        """Set the display brightness 0-7."""
        # brightness 0 = 1/16th pulse width
        # brightness 7 = 14/16th pulse width
        if val is None:
            return self._brightness
        if not 0 <= val <= 7:
            raise ValueError("Brightness out of range")

        self._brightness = val
        self._write_data_cmd()
        self._write_dsp_ctrl()

    def write(self, segments, pos=0):
        """Display up to 6 segments moving right from a given position.
        The MSB in the 2nd segment controls the colon between the 2nd
        and 3rd segments."""
        if not 0 <= pos <= 5:
            raise ValueError("Position out of range")
        self._write_data_cmd()
        self._start()

        self._write_byte(TM1637_CMD2 | pos)
        for seg in segments:
            self._write_byte(seg)
        self._stop()
        self._write_dsp_ctrl()

    def encode_digit(self, digit):
        """Convert a character 0-9, a-f to a segment."""
        return _SEGMENTS[digit & 0x0f]

    def encode_string(self, string):
        """Convert an up to 4 character length string containing 0-9, a-z,
        space, dash, star to an array of segments, matching the length of the
        source string."""
        segments = bytearray(len(string))
        for i in range(len(string)):
            segments[i] = self.encode_char(string[i])
        return segments

    def encode_char(self, char):
        """Convert a character 0-9, a-z, space, dash or star to a segment."""
        o = ord(char)
        if o == 32:
            return _SEGMENTS[36] # space
        if o == 42:
            return _SEGMENTS[38] # star/degrees
        if o == 45:
            return _SEGMENTS[37] # dash
        if o >= 65 and o <= 90:
            return _SEGMENTS[o-55] # uppercase A-Z
        if o >= 97 and o <= 122:
            return _SEGMENTS[o-87] # lowercase a-z
        if o >= 48 and o <= 57:
            return _SEGMENTS[o-48] # 0-9
        raise ValueError("Character out of range: {:d} '{:s}'".format(o, chr(o)))

    def hex(self, val):
        """Display a hex value 0x0000 through 0xffff, right aligned."""
        string = '{:04x}'.format(val & 0xffff)
        self.write(self.encode_string(string))

    def number(self, num):
        """Display a numeric value -999 through 9999, right aligned."""
        # limit to range -999 to 9999
        num = max(-999, min(num, 9999))
        string = '{0: >4d}'.format(num)
        self.write(self.encode_string(string))

    def numbers(self, num1, num2, colon=True):
        """Display two numeric values -9 through 99, with leading zeros
        and separated by a colon."""
        num1 = max(-9, min(num1, 99))
        num2 = max(-9, min(num2, 99))
        segments = self.encode_string('{0:0>2d}{1:0>2d}'.format(num1, num2))
        if colon:
            segments[1] |= 0x80 # colon on
        self.write(segments)

    def temperature(self, num):
        if num < -9:
            self.show('lo') # low
        elif num > 99:
            self.show('hi') # high
        else:
            string = '{0: >2d}'.format(num)
            self.write(self.encode_string(string))
        self.write([_SEGMENTS[38], _SEGMENTS[12]], 2) # degrees C

    def temperature_f(self, num):
        if num < -9:
            self.show('lo') # low
        elif num > 99:
            self.show('hi') # high
        else:
            string = '{0: >2d}'.format(num)
            self.write(self.encode_string(string))
        self.write([_SEGMENTS[38], _SEGMENTS[15]], 2) # degrees F

    def show(self, string, colon=False):
        segments = self.encode_string(string)
        if len(segments) > 1 and colon:
            segments[1] |= 128
        self.write(segments[:4])

    def scroll(self, string, delay=250):
        segments = string if isinstance(string, list) else self.encode_string(string)
        data = [0] * 8
        data[4:0] = list(segments)
        for i in range(len(segments) + 5):
            self.write(data[0+i:4+i])
            sleep_ms(delay)


class TM1637Decimal(TM1637):
    """Library for quad 7-segment LED modules based on the TM1637 LED driver.

    This class is meant to be used with decimal display modules (modules
    that have a decimal point after each 7-segment LED).
    """

    def encode_string(self, string):
        """Convert a string to LED segments.

        Convert an up to 4 character length string containing 0-9, a-z,
        space, dash, star and '.' to an array of segments, matching the length of
        the source string."""
        segments = bytearray(len(string.replace('.','')))
        j = 0
        for i in range(len(string)):
            if string[i] == '.' and j > 0:
                segments[j-1] |= TM1637_MSB
                continue
            segments[j] = self.encode_char(string[i])
            j += 1
        return segments
Con el módulo cargado en la placa, ya puedes usar las funciones de la librería desde tu código para controlar el display TM1637.
Probando el display TM1637 (funciones básicas)
El siguiente ejemplo recorre la mayoría de las funciones que ofrece la librería. Es una versión modificada y simplificada del ejemplo que trae el módulo original.
# Rui Santos & Sara Santos - Random Nerd Tutorials
# Complete project details at https://RandomNerdTutorials.com/micropython-esp32-esp8266-tm1637-display/
import tm1637
from machine import Pin
from time import sleep

# Initialize display (adjust pins if needed)
display = tm1637.TM1637(clk=Pin(19), dio=Pin(18))
# Example for ESP8266 boards:
#display = tm1637.TM1637(clk=Pin(14), dio=Pin(12))

# Set display brightness
display.brightness(7)

while True:

    # all LEDS on "88:88"
    display.write([127, 255, 127, 127])
    sleep(1)

    # all LEDS off
    display.write([0, 0, 0, 0])
    sleep(1)

    # show "0123"
    display.write([63, 6, 91, 79])
    sleep(1)

    # show "COOL"
    display.write([0b00111001, 0b00111111, 0b00111111, 0b00111000])
    sleep(1)

    # show "HELP"
    display.show('help')
    sleep(1)

    # display "dEAd", "bEEF"
    display.hex(0xdead)
    sleep(1)
    display.hex(0xbeef)
    sleep(1)

    # show "12:59"
    display.numbers(12, 59)
    sleep(1)

    # show "-123"
    display.number(-123)
    sleep(1)

    # show temperature '24*C'
    display.temperature(24)
    sleep(1)

    # show temperature '75*F'
    display.temperature_f(75)
    sleep(1)

    # display scrolling text
    display.scroll('Random Nerd Tutorials', delay=500)
    sleep(1)
Veamos rápidamente cómo trabaja el código para entender cada función.
Inicializar el display
Esta línea crea el objeto del display. Puedes editarla para cambiar de pines.
display = tm1637.TM1637(clk=Pin(19), dio=Pin(18))
Si usas un ESP8266, puedes recurrir a esta otra combinación:
display = tm1637.TM1637(clk=Pin(14), dio=Pin(12))
Ajustar el brillo
Para regular el brillo solo tienes que llamar al método brightness() sobre el objeto display y pasarle un número entre 0 (mínimo) y 7 (máximo).
display.brightness(7)
Escribir segmentos a mano
Con el método write() puedes encender o apagar segmentos individuales de cada dígito. Cada dígito de 7 segmentos se representa con un byte: los 7 bits inferiores controlan los segmentos y el bit 8 (MSB) controla el colon (solo tiene efecto en el segundo dígito).
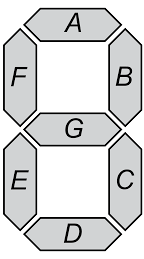
La correspondencia entre bit y segmento es esta:
| Segmento | Bit |
|---|---|
| A | 0 |
| B | 1 |
| C | 2 |
| D | 3 |
| E | 4 |
| F | 5 |
| G | 6 |
Un bit en 1 enciende el segmento y un bit en 0 lo apaga. El byte se lee desde el bit del segmento G (más significativo de los datos) hasta el del segmento A. Por ejemplo, 0b0000110 enciende los segmentos C y B. Puedes pasar el valor en binario, hexadecimal o decimal. Aquí está la tabla completa de la fuente de 7 segmentos en la documentación de la librería.
Esta parte del ejemplo muestra el uso de write():
# all LEDS on "88:88"
display.write([127, 255, 127, 127])
sleep(1)

# all LEDS off
display.write([0, 0, 0, 0])
sleep(1)

# show "0123"
display.write([63, 6, 91, 79])
sleep(1)

# show "COOL"
display.write([0b00111001, 0b00111111, 0b00111111, 0b00111000])
sleep(1)
Mostrar texto
Para escribir texto usa el método show() y pásale la cadena que quieres mostrar. La librería soporta hasta 4 caracteres.
# show "HELP"
display.show('help')
Mostrar números
Si quieres mostrar dos números de dos dígitos a cada lado del colon (útil para un reloj), usa numbers():
# show "12:59"
display.numbers(12, 59)
Para mostrar un solo número de hasta cuatro dígitos (acepta negativos) usa number():
# show "-123"
display.number(-123)
Y si necesitas mostrar valores hexadecimales (de 0x0000 a 0xffff) usa hex():
# display "dEAd", "bEEF"
display.hex(0xdead)
sleep(1)
display.hex(0xbeef)
sleep(1)
Mostrar temperatura
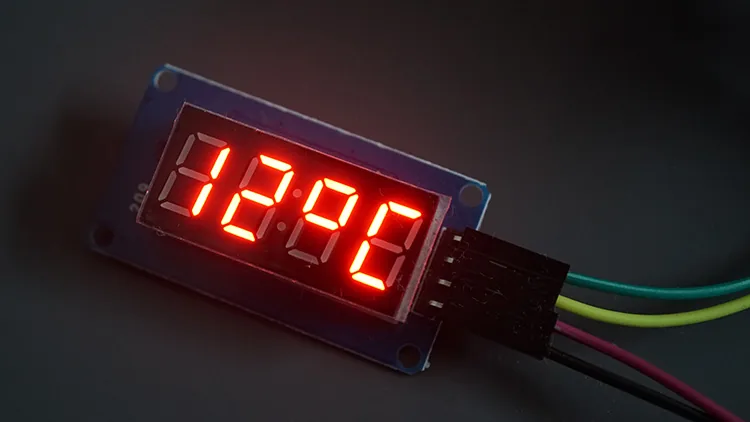
Para mostrar valores de temperatura de dos dígitos con el símbolo de grados, usa temperature() para Celsius y temperature_f() para Fahrenheit.
# show temperature '24*C'
display.temperature(24)
sleep(1)

# show temperature '75*F'
display.temperature_f(75)
sleep(1)
Texto en movimiento (scroll)
Cuando el texto tiene más de cuatro caracteres, la función scroll() te permite desplazarlo de derecha a izquierda con velocidad ajustable. El primer argumento es la cadena y el segundo es el retardo en milisegundos entre cada paso.
# display scrolling text
display.scroll('Random Nerd Tutorials', delay=500)
Proyecto: pronosticador de temperatura y clima
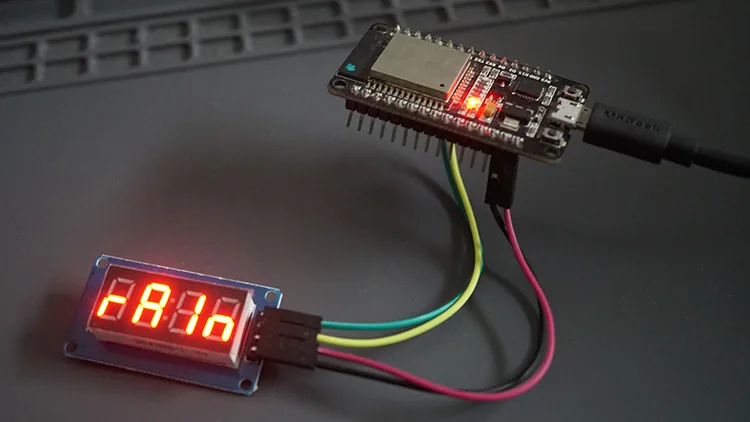
Ahora vamos a lo entretenido. Vas a conectar tu placa a internet por WiFi, pedir el clima actual a una API y mostrar la condición y la temperatura en el TM1637, que se actualizan automáticamente cada hora.
Obtener la API key de WeatherAPI
Los datos del clima los obtenemos desde WeatherAPI haciendo una petición HTTP a la URL correcta. Esta API es gratuita y entrega información del clima de casi cualquier lugar del mundo. Nosotros tomaremos la temperatura y la condición actual, pero puedes ampliar el código para mostrar más datos.
- Entra a weatherapi.com y crea una cuenta o inicia sesión.
- Entra a tu panel y copia la API key a un lugar seguro, porque la vas a necesitar después.
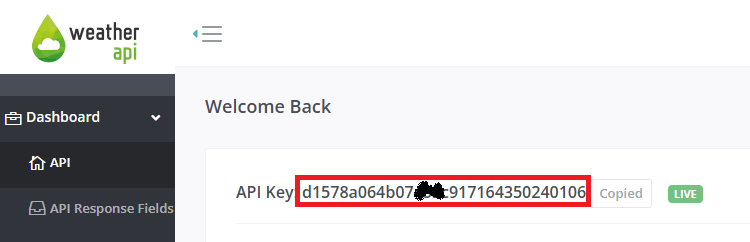
Para probar la API antes de programar la placa, pega esta URL en tu navegador reemplazando tu ubicación y tu key:
https://api.weatherapi.com/v1/current.json?q=YOUR_LOCATION+&key=YOUR_API_KEY
La API devuelve un JSON con muchos campos. A nosotros nos interesan temp_c, temp_f y condition.text:
{
  "current": {
    "temp_c": 16.1,
    "temp_f": 61,
    "condition": {
      "text": "Partly Cloudy"
    }
  }
}
Código completo
Copia este código a Thonny IDE, reemplaza tus credenciales WiFi, tu API key y tu ciudad, y súbelo a la placa. Recuerda ajustar los pines clk y dio para que coincidan con tu cableado (los diagramas de más arriba usan GPIO 19 y 18 en el ESP32).
# Rui Santos & Sara Santos - Random Nerd Tutorials
# Complete project details at https://RandomNerdTutorials.com/micropython-esp32-esp8266-tm1637-display/
import network
import time
import requests
import tm1637
from machine import Pin, Timer

# Initialize display (adjust pins if needed)
display = tm1637.TM1637(clk=Pin(21), dio=Pin(20))

# Wi-Fi credentials
ssid = 'REPLACE_WITH_YOUR_SSID'
password = 'REPLACE_WITH_YOUR_PASSWORD'

api_key = 'REPLACE_WITH_YOUR_weatherapi'
location ='Oporto'   # Documentation https://www.weatherapi.com/docs/

# Request URL
url = f'https://api.weatherapi.com/v1/current.json?q={location}+&key={api_key}'

# Connect to network
def connect_wifi(ssid, password):
    # Connect to your network
    station = network.WLAN(network.STA_IF)
    station.active(True)
    station.connect(ssid, password)

    # Wait for connection
    timeout = 10
    while not station.isconnected() and timeout > 0:
        time.sleep(1)
        timeout -= 1

    if station.isconnected():
        print('Connection successful')
        print(station.ifconfig())
        return True
    else:
        print('Connection failed - timeout reached')
        return False

def getWeather(timer):
    if connect_wifi(ssid, password):
        try:
            # Make the request
            response = requests.get(url)
            #Print the response code
            print('Response code: ', response.status_code)

            # Get response content
            weather = response.json()
            # Close the request
            response.close()

            # Print bulk weather data
            print('Weather JSON: ', weather)

            # Declare these variables as globals
            global weather_description, temperature_c, temperature_f

            # Get specific weather data
            weather_description = weather['current']['condition']['text']
            print('Current weather: ', weather_description)

            # Temperature and humidity
            temperature_c = weather['current']['temp_c']
            temperature_f = weather['current']['temp_f']
            print(f'Temperature in Celsius: {temperature_c:.2f}')
            print(f'Temperature in Fahrenheit: {temperature_f:.2f}')

        except Exception as e:
            # Handle any exceptions during the request
            print('Error during request:', e)
            display.show('erro')

# Get Weather for the first time
getWeather(0)

# Create a periodic timer that gets new data from the API
api_timer = Timer()
api_timer.init(mode=Timer.PERIODIC, period=3600000, callback=getWeather)

while True:
    display.scroll(weather_description)
    time.sleep(1)
    display.temperature(round(temperature_c))
    time.sleep(5)
    display.temperature_f(round(temperature_f))
    time.sleep(5)
Cómo funciona el código
Configuración inicial. Se crea el objeto display (ajusta los pines a tu cableado) y se definen tu SSID, contraseña, API key y ubicación. La url arma la petición a WeatherAPI con esos datos.
Conexión WiFi. La función connect_wifi() activa la interfaz de estación, intenta conectarse y espera hasta 10 segundos. Si no logra conectar dentro de ese tiempo, devuelve False en vez de quedarse pegada para siempre.
Lectura del clima. getWeather() hace la petición HTTP GET, convierte la respuesta a JSON y extrae la condición y las temperaturas en Celsius y Fahrenheit, que guarda en variables globales. Se llama una vez al inicio y luego cada hora gracias a un Timer periódico configurado en 3.600.000 milisegundos. Si algo falla, muestra erro en el display.
Bucle principal. El while True cicla mostrando la condición del clima en scroll, luego la temperatura en Celsius y después en Fahrenheit, con pausas entre cada una.
Variantes y mejoras
Cuando ya tengas el proyecto base andando, puedes llevarlo más lejos:
- Reloj de verdad con módulo RTC. Si quieres que el display muestre la hora exacta aunque se corte la luz, agrega un módulo RTC DS3231 por I2C. Lees la hora del RTC y la muestras con
display.numbers(horas, minutos)activando el colon para el típico parpadeo de reloj. - Termómetro local sin internet. Reemplaza la llamada a la API por la lectura de un sensor DHT22 o DS18B20 conectado a la placa. Así muestras la temperatura ambiente real de tu pieza sin depender del WiFi, usando la misma función
display.temperature(). - Contador regresivo o cronómetro. Con la función
number()y un par de botones puedes armar un temporizador de cocina o un cronómetro para entrenar, mostrando los segundos que quedan en pantalla. - Ajustar el brillo según la hora. Combina el RTC con
brightness()para bajar el brillo de noche y subirlo de día, ideal si lo dejas en el velador.
Personalización para Chile
En Chile puedes conseguir todo lo necesario en MechatronicStore:
- Placa ESP32 DevKit con WiFi (SKU X2-10V2): $9.990 (agotado)
- NodeMCU ESP8266 con WiFi (SKU X3-9): $5.990
- Módulo display TM1637 de 4 dígitos y 7 segmentos (SKU D-204): $2.900
- Cables dupont macho hembra (SKU C-415): $1.990
- Cable USB Tipo C (SKU B-101): $2.190
El proyecto funciona igual con el ESP32 o con el ESP8266: el ESP32 es más potente y trae el conector USB Tipo C, mientras que el ESP8266 es la opción más económica si solo necesitas WiFi. Para el cable de datos te basta con cuatro jumpers macho hembra (CLK, DIO, VCC y GND). Si en tu placa el conector es micro USB en lugar de Tipo C, usa el cable que corresponda a tu modelo.
Recursos
- Tutorial original (inglés): MicroPython: ESP32/ESP8266 with TM1637 4-Digit LED 7-Segment Display
- Librería MicroPython TM1637 (original de Mike Causer): micropython-tm1637
- Archivo tm1637.py (versión forkeada lista para usar): tm1637.py
- Servicio de clima: WeatherAPI
Tutorial basado en el material de Rui Santos y Sara Santos (Random Nerd Tutorials). Versión chilena con componentes en stock local en MechatronicStore.