Introducción
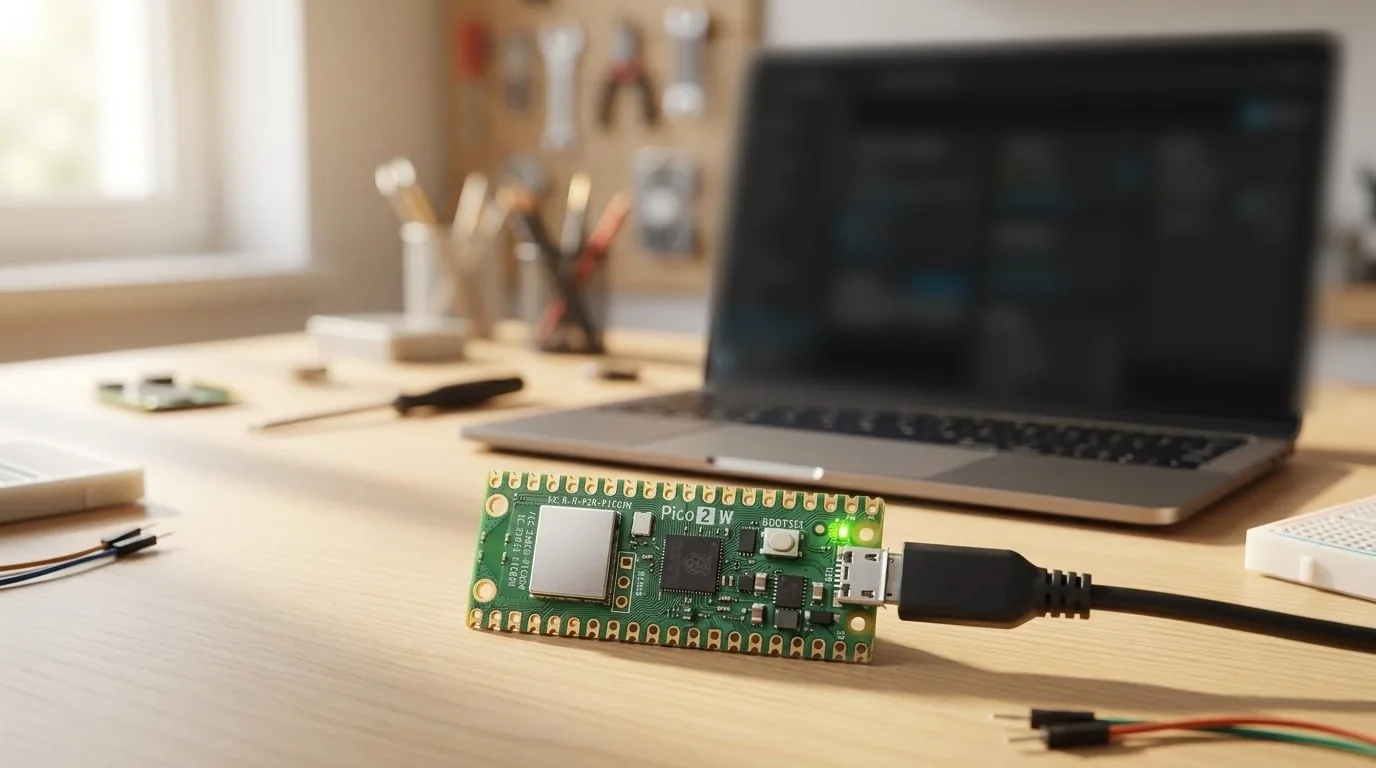
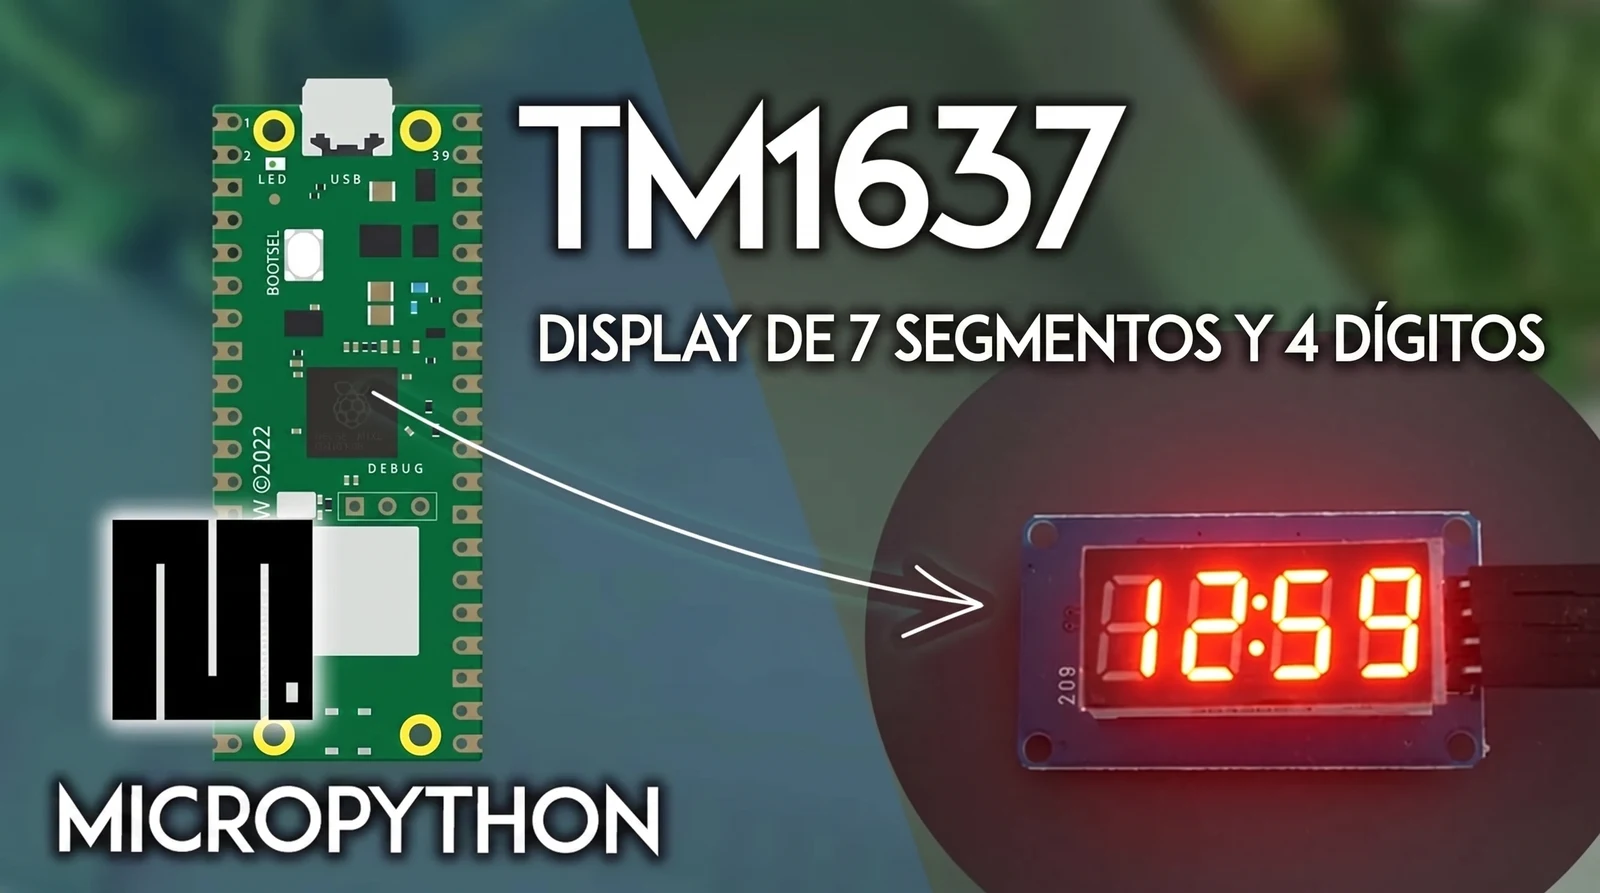
En este tutorial vas a aprender a usar el display de 7 segmentos TM1637 de 4 dígitos con la Raspberry Pi Pico programada con MicroPython. Vemos cómo conectar el módulo a la placa, instalar la librería necesaria y los comandos básicos para controlar el display.
Requisitos previos: firmware MicroPython
Para seguir este tutorial necesitas tener el firmware de MicroPython instalado en tu Raspberry Pi Pico. También necesitas un IDE para escribir y subir el código a la placa. El IDE recomendado para la Pico es Thonny IDE.
Si todavía estás partiendo con la Raspberry Pi Pico, primero revisa una guía de inicio rápido para flashear el firmware MicroPython y subir código.
Conociendo el display TM1637 de 4 dígitos
El display LED TM1637 combina cuatro dígitos de 7 segmentos en un solo módulo que se controla mediante el driver TM1637. El módulo que usamos acá tiene cuatro dígitos separados por dos puntos (:) entre el segundo y el tercer dígito, ideal para mostrar la hora.
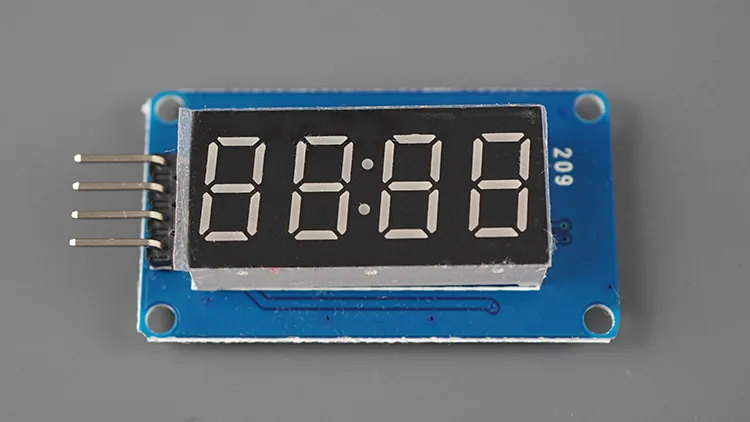
Existen variantes similares con puntos entre los dígitos en lugar de los dos puntos. También hay módulos con seis dígitos, pero requieren una librería distinta a la que vamos a usar acá.
Nota: Probé el módulo de seis dígitos, pero muchos vienen con fallas de fábrica. Por eso este tutorial es solo para el módulo de cuatro dígitos con dos puntos en el medio.
Materiales
Para armar este proyecto necesitas:
- Raspberry Pi Pico (cualquier modelo)
- Módulo display TM1637 de 7 segmentos, 4 dígitos
- Cables jumper (macho a macho o macho a hembra)
- Cable micro USB para alimentar y programar la Pico
Todos estos componentes están disponibles en MechatronicStore (links al final del tutorial).
Conexiones: TM1637 a la Raspberry Pi Pico
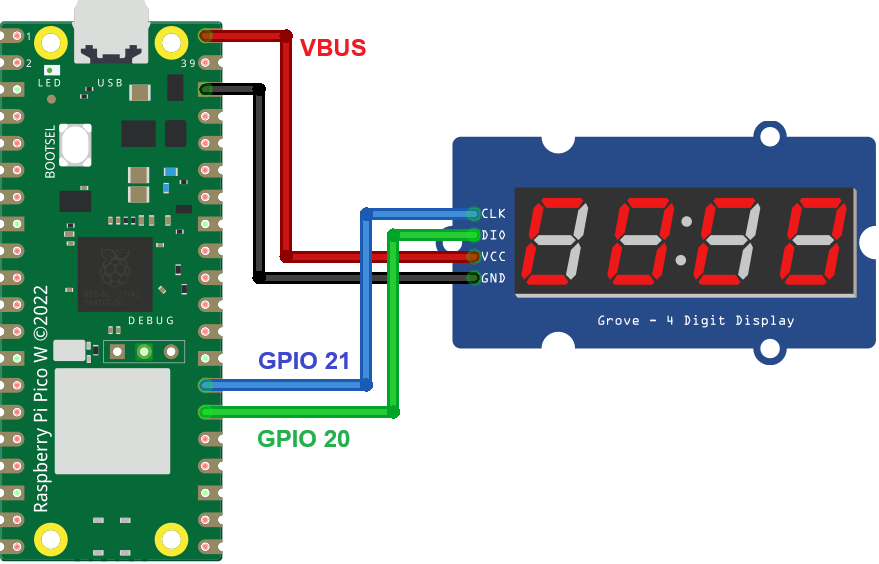
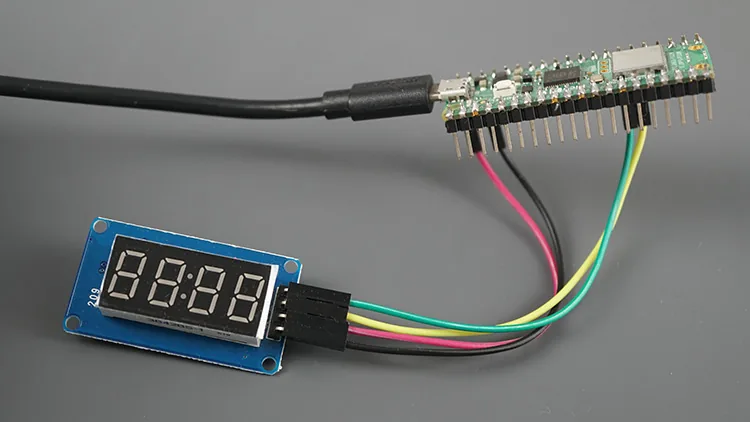
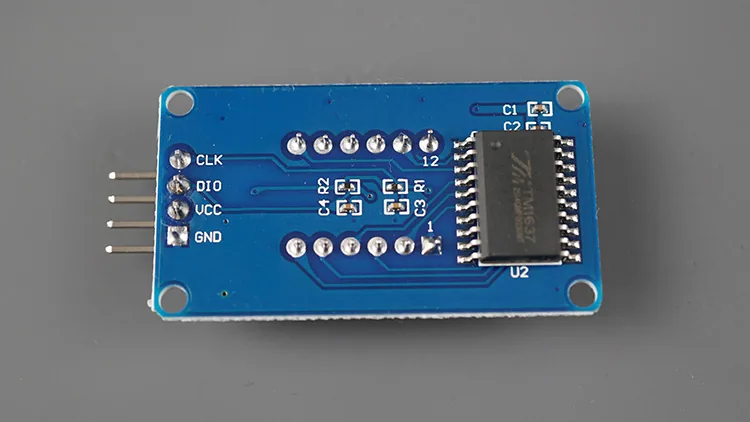
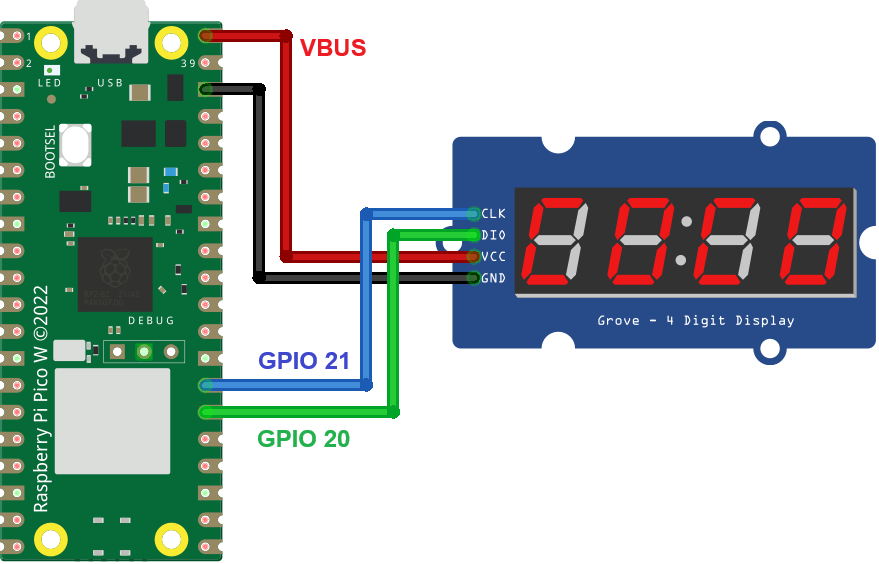
El cableado es muy simple: solo necesitas dos pines digitales, CLK y DIO, más alimentación.
| TM1637 | Raspberry Pi Pico |
|---|---|
| CLK | Pin digital (ej. GPIO 21) |
| DIO | Pin digital (ej. GPIO 20) |
| VCC | VBUS o 3V3 |
| GND | GND |
Puedes usar cualquier otro GPIO digital disponible. Revisa la guía de pinout de la Raspberry Pi Pico para más detalles.
Librería MicroPython para el TM1637
Para facilitar la comunicación con el display, vamos a usar un fork de la librería micropython-tm1637 de Mike Causer. Sigue estos pasos para instalarla:
1. Descarga el archivo tm1637.py desde el repositorio oficial. El código completo de la librería es el siguiente:
"""
MicroPython TM1637 quad 7-segment LED display driver
https://github.com/mcauser/micropython-tm1637

MIT License
Copyright (c) 2016-2023 Mike Causer

Permission is hereby granted, free of charge, to any person obtaining a copy
of this software and associated documentation files (the "Software"), to deal
in the Software without restriction, including without limitation the rights
to use, copy, modify, merge, publish, distribute, sublicense, and/or sell
copies of the Software, and to permit persons to whom the Software is
furnished to do so, subject to the following conditions:

The above copyright notice and this permission notice shall be included in all
copies or substantial portions of the Software.

THE SOFTWARE IS PROVIDED "AS IS", WITHOUT WARRANTY OF ANY KIND, EXPRESS OR
IMPLIED, INCLUDING BUT NOT LIMITED TO THE WARRANTIES OF MERCHANTABILITY,
FITNESS FOR A PARTICULAR PURPOSE AND NONINFRINGEMENT. IN NO EVENT SHALL THE
AUTHORS OR COPYRIGHT HOLDERS BE LIABLE FOR ANY CLAIM, DAMAGES OR OTHER
LIABILITY, WHETHER IN AN ACTION OF CONTRACT, TORT OR OTHERWISE, ARISING FROM,
OUT OF OR IN CONNECTION WITH THE SOFTWARE OR THE USE OR OTHER DEALINGS IN THE
SOFTWARE.
"""

__version__ = '1.3.0'

from micropython import const
from machine import Pin
from time import sleep_us, sleep_ms

TM1637_CMD1 = const(64)  # 0x40 data command
TM1637_CMD2 = const(192) # 0xC0 address command
TM1637_CMD3 = const(128) # 0x80 display control command
TM1637_DSP_ON = const(8) # 0x08 display on
TM1637_DELAY = const(10) # 10us delay between clk/dio pulses
TM1637_MSB = const(128)  # msb is the decimal point or the colon depending on your display

# 0-9, a-z, blank, dash, star
_SEGMENTS = bytearray(b'\x3F\x06\x5B\x4F\x66\x6D\x7D\x07\x7F\x6F\x77\x7C\x39\x5E\x79\x71\x3D\x76\x06\x1E\x76\x38\x55\x54\x3F\x73\x67\x50\x6D\x78\x3E\x1C\x2A\x76\x6E\x5B\x00\x40\x63')

class TM1637(object):
    """Library for quad 7-segment LED modules based on the TM1637 LED driver."""
    def __init__(self, clk, dio, brightness=7):
        self.clk = clk
        self.dio = dio

        if not 0 <= brightness <= 7:
            raise ValueError("Brightness out of range")
        self._brightness = brightness

        self.clk.init(Pin.OUT, value=0)
        self.dio.init(Pin.OUT, value=0)
        sleep_us(TM1637_DELAY)

        self._write_data_cmd()
        self._write_dsp_ctrl()

    def _start(self):
        self.dio(0)
        sleep_us(TM1637_DELAY)
        self.clk(0)
        sleep_us(TM1637_DELAY)

    def _stop(self):
        self.dio(0)
        sleep_us(TM1637_DELAY)
        self.clk(1)
        sleep_us(TM1637_DELAY)
        self.dio(1)

    def _write_data_cmd(self):
        # automatic address increment, normal mode
        self._start()
        self._write_byte(TM1637_CMD1)
        self._stop()

    def _write_dsp_ctrl(self):
        # display on, set brightness
        self._start()
        self._write_byte(TM1637_CMD3 | TM1637_DSP_ON | self._brightness)
        self._stop()

    def _write_byte(self, b):
        for i in range(8):
            self.dio((b >> i) & 1)
            sleep_us(TM1637_DELAY)
            self.clk(1)
            sleep_us(TM1637_DELAY)
            self.clk(0)
            sleep_us(TM1637_DELAY)
        self.clk(0)
        sleep_us(TM1637_DELAY)
        self.clk(1)
        sleep_us(TM1637_DELAY)
        self.clk(0)
        sleep_us(TM1637_DELAY)

    def brightness(self, val=None):
        """Set the display brightness 0-7."""
        # brightness 0 = 1/16th pulse width
        # brightness 7 = 14/16th pulse width
        if val is None:
            return self._brightness
        if not 0 <= val <= 7:
            raise ValueError("Brightness out of range")

        self._brightness = val
        self._write_data_cmd()
        self._write_dsp_ctrl()

    def write(self, segments, pos=0):
        """Display up to 6 segments moving right from a given position.
        The MSB in the 2nd segment controls the colon between the 2nd
        and 3rd segments."""
        if not 0 <= pos <= 5:
            raise ValueError("Position out of range")
        self._write_data_cmd()
        self._start()

        self._write_byte(TM1637_CMD2 | pos)
        for seg in segments:
            self._write_byte(seg)
        self._stop()
        self._write_dsp_ctrl()

    def encode_digit(self, digit):
        """Convert a character 0-9, a-f to a segment."""
        return _SEGMENTS[digit & 0x0f]

    def encode_string(self, string):
        """Convert an up to 4 character length string containing 0-9, a-z,
        space, dash, star to an array of segments, matching the length of the
        source string."""
        segments = bytearray(len(string))
        for i in range(len(string)):
            segments[i] = self.encode_char(string[i])
        return segments

    def encode_char(self, char):
        """Convert a character 0-9, a-z, space, dash or star to a segment."""
        o = ord(char)
        if o == 32:
            return _SEGMENTS[36] # space
        if o == 42:
            return _SEGMENTS[38] # star/degrees
        if o == 45:
            return _SEGMENTS[37] # dash
        if o >= 65 and o <= 90:
            return _SEGMENTS[o-55] # uppercase A-Z
        if o >= 97 and o <= 122:
            return _SEGMENTS[o-87] # lowercase a-z
        if o >= 48 and o <= 57:
            return _SEGMENTS[o-48] # 0-9
        raise ValueError("Character out of range: {:d} '{:s}'".format(o, chr(o)))

    def hex(self, val):
        """Display a hex value 0x0000 through 0xffff, right aligned."""
        string = '{:04x}'.format(val & 0xffff)
        self.write(self.encode_string(string))

    def number(self, num):
        """Display a numeric value -999 through 9999, right aligned."""
        # limit to range -999 to 9999
        num = max(-999, min(num, 9999))
        string = '{0: >4d}'.format(num)
        self.write(self.encode_string(string))

    def numbers(self, num1, num2, colon=True):
        """Display two numeric values -9 through 99, with leading zeros
        and separated by a colon."""
        num1 = max(-9, min(num1, 99))
        num2 = max(-9, min(num2, 99))
        segments = self.encode_string('{0:0>2d}{1:0>2d}'.format(num1, num2))
        if colon:
            segments[1] |= 0x80 # colon on
        self.write(segments)

    def temperature(self, num):
        if num < -9:
            self.show('lo') # low
        elif num > 99:
            self.show('hi') # high
        else:
            string = '{0: >2d}'.format(num)
            self.write(self.encode_string(string))
        self.write([_SEGMENTS[38], _SEGMENTS[12]], 2) # degrees C

    def temperature_f(self, num):
        if num < -9:
            self.show('lo') # low
        elif num > 99:
            self.show('hi') # high
        else:
            string = '{0: >2d}'.format(num)
            self.write(self.encode_string(string))
        self.write([_SEGMENTS[38], _SEGMENTS[15]], 2) # degrees F

    def show(self, string, colon=False):
        segments = self.encode_string(string)
        if len(segments) > 1 and colon:
            segments[1] |= 128
        self.write(segments[:4])

    def scroll(self, string, delay=250):
        segments = string if isinstance(string, list) else self.encode_string(string)
        data = [0] * 8
        data[4:0] = list(segments)
        for i in range(len(segments) + 5):
            self.write(data[0+i:4+i])
            sleep_ms(delay)


class TM1637Decimal(TM1637):
    """Library for quad 7-segment LED modules based on the TM1637 LED driver.

    This class is meant to be used with decimal display modules (modules
    that have a decimal point after each 7-segment LED).
    """

    def encode_string(self, string):
        """Convert a string to LED segments.

        Convert an up to 4 character length string containing 0-9, a-z,
        space, dash, star and '.' to an array of segments, matching the length of
        the source string."""
        segments = bytearray(len(string.replace('.','')))
        j = 0
        for i in range(len(string)):
            if string[i] == '.' and j > 0:
                segments[j-1] |= TM1637_MSB
                continue
            segments[j] = self.encode_char(string[i])
            j += 1
        return segments
2. Copia el código a un archivo nuevo en Thonny IDE.
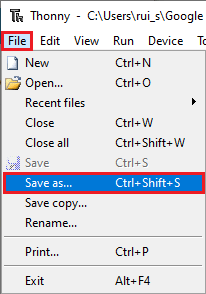
3. Anda al menú Archivo > Guardar como…
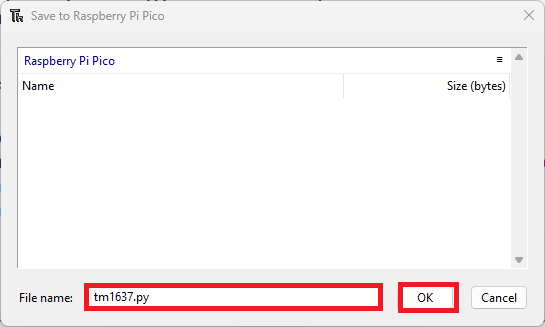
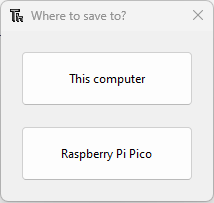
4. Selecciona guardar en la Raspberry Pi Pico:
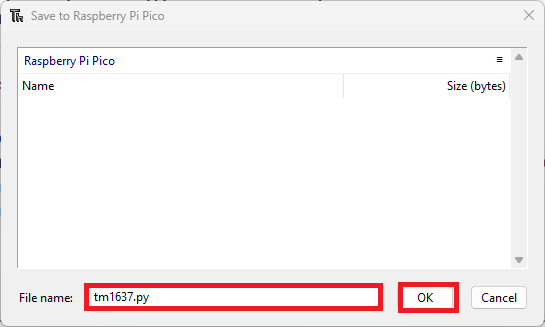
5. Guarda el archivo con el nombre tm1637.py (no cambies el nombre).
Con la librería cargada en la Pico, ya puedes usar sus funciones en tu propio código.
Probando el display: funciones básicas
El siguiente ejemplo muestra la mayoría de las funciones que ofrece la librería. Es una versión simplificada del ejemplo oficial:
# Rui Santos & Sara Santos - Random Nerd Tutorials
# Complete project details at https://RandomNerdTutorials.com/raspberry-pi-pico-tm1637-micropython/

import tm1637
from machine import Pin
from time import sleep

# Initialize display (adjust pins if needed)
display = tm1637.TM1637(clk=Pin(21), dio=Pin(20))

# Set display brightness
display.brightness(7)

while True:
    # all LEDS on "88:88"
    display.write([127, 255, 127, 127])
    sleep(1)

    # all LEDS off
    display.write([0, 0, 0, 0])
    sleep(1)

    # show "0123"
    display.write([63, 6, 91, 79])
    sleep(1)

    # show "COOL"
    display.write([0b00111001, 0b00111111, 0b00111111, 0b00111000])
    sleep(1)

    # show "HELP"
    display.show('help')
    sleep(1)

    # display "dEAd", "bEEF"
    display.hex(0xdead)
    sleep(1)
    display.hex(0xbeef)
    sleep(1)

    # show "12:59"
    display.numbers(12, 59)
    sleep(1)

    # show "-123"
    display.number(-123)
    sleep(1)

    # show temperature '24*C'
    display.temperature(24)
    sleep(1)

    # show temperature '75*F'
    display.temperature_f(75)
    sleep(1)

    # display scrolling text
    display.scroll('Random Nerd Tutorials', delay=500)
    sleep(1)
Inicializar el display
La línea siguiente inicializa el display. Puedes cambiar los pines si lo necesitas:
display = tm1637.TM1637(clk=Pin(21), dio=Pin(20))
Ajustar el brillo
Para ajustar el brillo usa el método brightness() con un valor entre 0 (mínimo) y 7 (máximo):
display.brightness(7)
Escribir segmentos individuales
Con el método write() puedes controlar cada segmento de cada dígito. Cada byte (los 7 bits bajos) representa un segmento; el bit 8 (MSB) controla los dos puntos y solo aplica al segundo dígito.
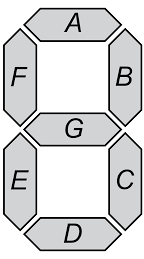
| Segmento | Bit |
|---|---|
| A | 0 |
| B | 1 |
| C | 2 |
| D | 3 |
| E | 4 |
| F | 5 |
| G | 6 |
Un bit en 1 enciende el segmento; en 0 lo apaga. Por ejemplo, 0b0000111 enciende los segmentos A, B y C.
# Todos los LEDs encendidos "88:88"
display.write([127, 255, 127, 127])

# Todos apagados
display.write([0, 0, 0, 0])

# Mostrar "0123"
display.write([63, 6, 91, 79])

# Mostrar "COOL"
display.write([0b00111001, 0b00111111, 0b00111111, 0b00111000])
Mostrar strings
Para mostrar texto usa show() pasando el string que quieres mostrar:
display.show('help')
Mostrar números
Usa numbers() para mostrar dos números (de dos dígitos) separados por los dos puntos, ideal para una hora como 12:59:
display.numbers(12, 59)
Para un solo número (incluso negativo, hasta 4 dígitos) usa number():
display.number(-123)
Mostrar temperatura
Para mostrar valores de temperatura con el símbolo de grado y la letra C o F:
# Mostrar '24*C'
display.temperature(24)

# Mostrar '75*F'
display.temperature_f(75)
Texto en movimiento
Si necesitas mostrar texto con más de 4 caracteres, usa scroll() que mueve el texto de derecha a izquierda con la velocidad que tú definas:
display.scroll('Random Nerd Tutorials', delay=500)
Demostración
Sube el código a tu Raspberry Pi Pico (Archivo > Guardar como > Raspberry Pi Pico, con el nombre main.py) o ejecútalo directamente desde Thonny con el botón verde de Run.
Con esto ya tienes lo necesario para integrar un display TM1637 en cualquier proyecto: relojes, contadores, termómetros o cualquier indicador numérico que necesites.
Conclusión
El display TM1637 es una solución barata y simple para mostrar números en tus proyectos con Raspberry Pi Pico. Con solo dos pines digitales tienes 4 dígitos completos más control de brillo y soporte para texto y temperaturas. La librería micropython-tm1637 te simplifica todo el trabajo de bajo nivel.